Introduction
Forget those bulky remotes! Make your home a smart safety that can be operated with your fingertips of a browser on the internet with ESP32 webserver. It allows you to dim lights, set the temperature, and track the use of energy all from your phone or tablet.
Open-source libraries and an active community open up a world of possibilities, including DIY sprinklers, garden monitoring, and rhythmic lighting.
Create the soundtrack for your smart home with ESP32 – ease, convenience, and creativity at your fingertips.
So in this blog, we’ll just look at the first project, which is how the esp32 webserver controls household applications.
1. What is the ESP32?
The ESP32 is a dual-core microcontroller with Wi-Fi and Bluetooth capabilities, making it ideal for a variety of applications, including the automation of homes.
Its affordable cost, low power consumption, and wide range of functions make it an excellent choice for both DIY projects and professional IoT applications.

2. What is MicroPython?
MicroPython is a lightweight Python 3 implementation that is optimized for use on microcontrollers and in limited situations.
MicroPython allows you to use Python’s simplicity and convenience of use to program microcontrollers such as the ESP32.
This enables developers to write code for the ESP32 in Python, making it available to a wider audience that lack major understanding of lower-level languages.
3. What is Relay?
In terms of home automation, a relay is a switch with an electromechanical mechanism that may be operated electrically.
Relays are frequently used to regulate high-voltage devices like lights, appliances, and other electrical equipment.
They serve as a bridge between low-voltage microcontrollers (such as the ESP32) and high-voltage devices, allowing remote control of many kinds of household appliances.
4. Difference between Python and MicroPython
Here are five major differences between Python and MicroPython:
1. Target audience:
Python: Python is designed for multipurpose programming, ranging from web development to machine learning. Suitable for both beginners and advanced users.
MicroPython: Designed for microcontrollers such as the ESP32 and Raspberry Pi Pico, which have low resources. Ideal for beginners in electronics or for projects with little resources.
2. Features and libraries:
Python: Python provides an extensive library of frameworks and libraries for a variety of activities. Supports multithreading, object-oriented programming, and advanced capabilities.
MicroPython: A smaller subset of conventional Python libraries that focuses on critical functions for embedded systems. Provides simpler syntax and a smaller memory usage.
3. Performance and memory:
Python: Python runs on powerful machines, which allows for faster execution and handling of larger data amounts. Increases memory and processing power.
MicroPython: MicroPython is optimized for microcontrollers, having slower execution and restricted memory abilities. focuses on optimization and compactness.
4. Development Environment:
Python: A wide range of Integrated Development Environments (IDEs) are available, including PyCharm and Visual Studio Code, which provide debugging tools and code completion.
MicroPython: Frequently accessed via a web interface or a basic text editor installed on the device. Debugging features are limited when compared to full-fledged Python IDEs.
5. Application:
Python: Python is used for web development, data analysis, scientific computing, and a variety of business applications.
MicroPython: MicroPython is ideal for robotics, Internet of Things projects, controlling LEDs and sensors, and developing electronic devices.
5. How to Install Thonny on Windows and Ubuntu
Thonny is a popular Python integrated development environment (IDE) that makes it easier to write and run code. Here’s how you can install Thonny on Windows and Ubuntu:
Windows:
1. Get the Thonny installer from the official website (https://thonny.org/).
2. Launch the installation and then follow the directions displayed on the screen.
3. Thonny will be installed on your system.
Ubuntu:
1. Launch a terminal window.
2. To install Thonny, run the following commands:
- sudo apt update
- sudo apt upgrade
- sudo apt install thonny
6. How to connect an ESP32 with Thonny, a Python IDE
Step 1: Connect ESP32 to Thonny
1. Launch the Thonny application on your computer.
2. Connect the ESP32 board to your computer using a USB cable.
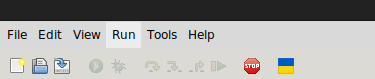
Step 2: Run Thonny
1. Click on the “Run” option in the top menu bar of Thonny.
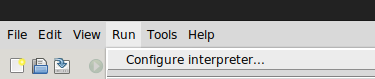
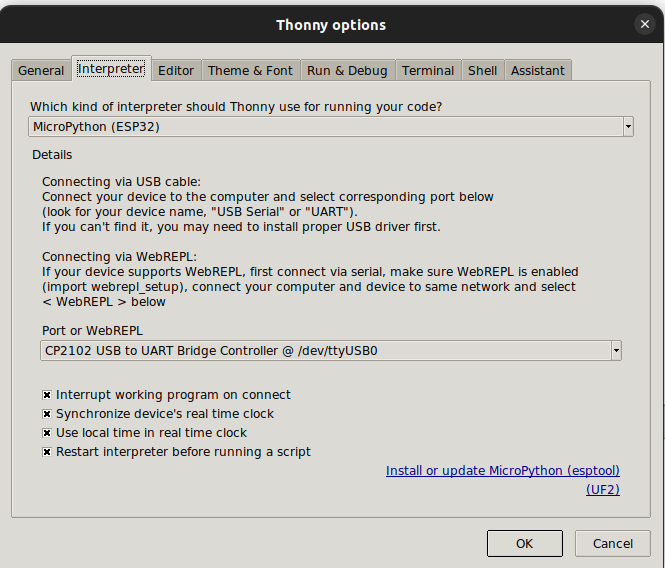
Step 3: Configure Interpreter
1. Select the “Configure Interpreter” option from the dropdown menu.
Step4 : Select Interpreter
1. In the Interpreter configuration window, choose the “MicroPython (ESP32)” option from the list of available interpreters.
2. Select the appropriate port for your ESP32 device.
3. Click “OK” to save the interpreter configuration.
Step 5: Paste Code
1. Now, you’re ready to work with your ESP32. Paste the code below into the Thonny editor.
Code:
# created by bhanutechbytes
import socket
import machine
import time
import network
sta_if = network.WLAN(network.STA_IF)
if not sta_if.isconnected():
  print('connecting to network...')
  sta_if.active(True)
  sta_if.connect('GPONWIFI_80D0', '0000000894')
  while not sta_if.isconnected():
    pass

print("wifi connected")
print('network config:', sta_if.ifconfig())
html='''<!DOCTYPE html>
<html>
<head><title>ESP32 LED on/off</title></head>
<center><h2>WebServer for turning LED on </h2></center>
<form>
<button name="LED" value='ON' type='submit'> LED ON </button>
<button name="LED" value='OFF' type='submit'> LED OFF </button>
<br><br>
'''

LED0 = machine.Pin(14,machine.Pin.OUT)
LED0.value(0)
s=socket.socket(socket.AF_INET,socket.SOCK_STREAM)
s.bind(('',80))
s.listen(5)
while True:
  conn,addr=s.accept()
  request=conn.recv(1024)
  request=str(request)
  LEDON=request.find('/?LED=ON')
  LEDOFF=request.find('/?LED=OFF')
  if(LEDON==6):
    LED0.value(1)
  if(LEDOFF==6):
    LED0.value(0)

  response=html
  conn.send(response)
  conn.close()
Note: (If any errors occur in the code, the most common type is indentation errors. Please double-check for these. If you encounter any errors, please notify me in the comments or via email. Additionally, if you require more electrical applications, ensure to add corresponding items in the code as well.)
2. Save the code.
3. Your computer, mobile, or tablet, which is being used to connect remotely to ESP32, must be connected to the same Wi-Fi network.
3. Click on the “Run” option again to execute the code on your ESP32.
Congratulations! You have successfully connected your ESP32 to Thonny and run a MicroPython script.
7. How to Connect an ESP32 Circuit
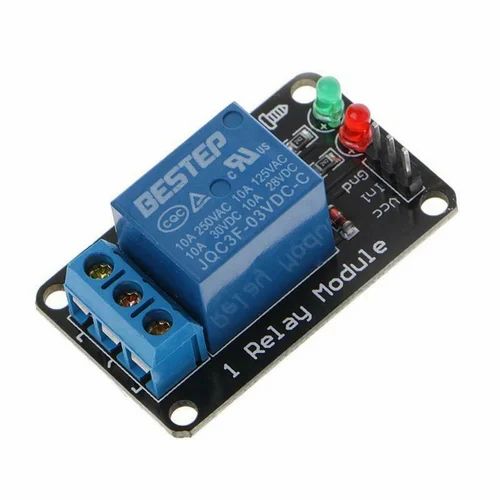
In an ESP32 and relay module setup, there are two types of relay modules available: one with 5V outputs and another with 3V outputs. If you choose a 5V ESP32, ensure that the relay module you select also operates at the same voltage.
Requirements:
1. ESP32
2. Relay module (with required channels)
3. DC power source
4. Breadboard or custom PCB (your choice)
5. Jumper wires
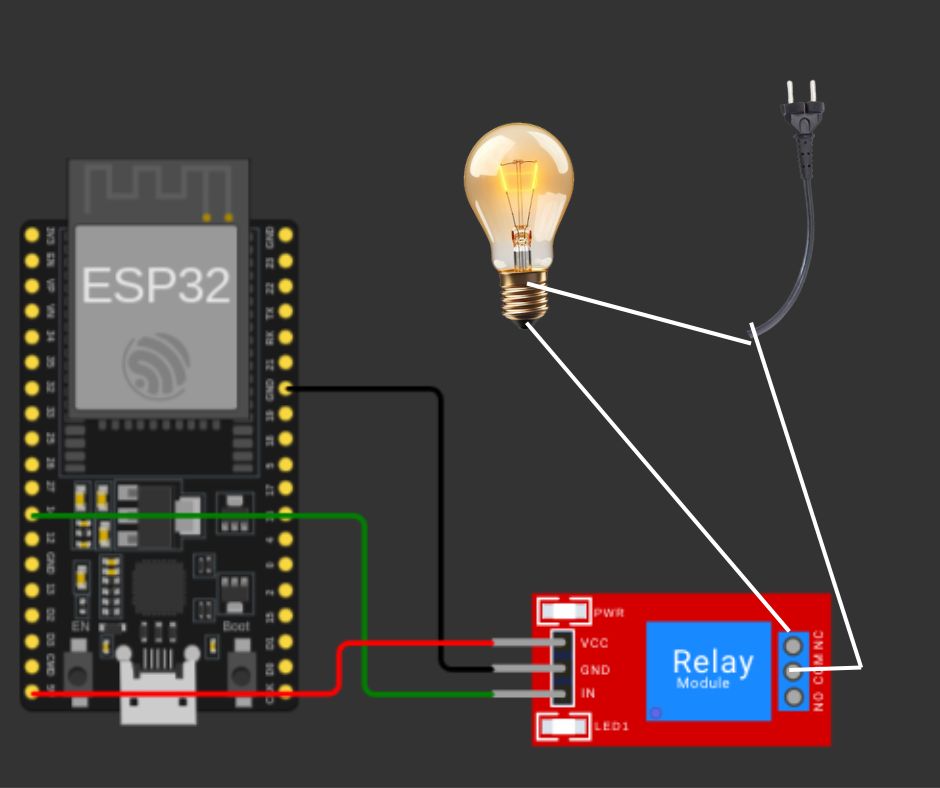
Circuit:
Procedure:
1. Connect the circuits according to the circuit diagram.
2. From the ESP32, connect the 5V output to the VCC pin on the relay.
3. Connect the ground pin of the ESP32 to the ground pin on the relay.
4. Connect pin D14 on the ESP32 to the IN pin on the relay, considering the custom channel pins.
5. Initially, connect and run the Thonny app. It will print the required IP address. Copy this IP address and paste it into a web browser.

6. Once it works perfectly, you can connect the DC input to the ESP32.
Conclusion
In conclusion, the ESP32 webserver, powered by MicroPython, revolutionizes home automation. This compact yet powerful microcontroller, paired with Thonny IDE, seamlessly controls household applications via a user-friendly interface.
The incorporation of relays facilitates the remote management of high-voltage devices, adding a layer of convenience.
By connecting the ESP32 to circuits with a relay module, users can unleash the potential of this technology, creating a smart home experience that is not only efficient but also accessible.
Embrace the future of home automation with ESP32 – where innovation meets simplicity.
Previous blog entries
1. How AI and IoT Impact Daily Life
3. Advantages and disadvantages of humanoid robots
4. Why are robots better at doing repetitive tasks than humans?
5. How Artificial Intelligence is Transforming Healthcare
6. What is the difference between GenAI and AGI?
7. Where are articulated robots used the most?
9. what is Artificial Intelligence and Data Science
10 .What is an ( AGVs) automated guided vehicle?
11.Will Blockchain be in demand in future?
12.Qubits Unveiled: A Guide to the Quantum World
13.Quantum Computing: Revolution Beyond Traditional Computers


4 thoughts on “ESP32 with Micropython to control electrical devices using a relay”